Pages

Friday, December 23, 2011

{Gifts} Neighborhood Cheer


Each Christmas I try to deliver a little something to my neighbors for the holiday. I feel extremely fortunate to be surrounded by a great group of people, young and old, and like to show my appreciation for them.

This year I filled jars with homemade chocolate peanut clusters. I found the jars at TJ Maxx for $1.99 each {not bad} and the clusters are an old favorite that couldn't be easier to make. If you're a sucker for chocolate and peanut butter like we are in this house, then I think you'll find these quite addicting. Here's the recipe:

:: Chocolate Peanut Clusters ::

Ingredients:
~ 24 ounce package almond bark {I have only been able to find this in Walmart}
~ 11 ounce package of chocolate chips
~ 1 1/2 pounds Planter's cocktail peanuts

Directions:
1. In a heavy skillet over low heat, melt almond bark. DO NOT OVERHEAT. Stir in chocolate chips and continue stirring until thoroughly mixed.
2. Add peanuts, stirring constantly. Mixture should be heavy with nuts.
3. Spread wax paper on counter and drop clusters by the tablespoon.
4. After clusters cool enough to retain shape, store in a cool place or refrigerate.
5. ENJOY!


I added a little pop of color to the jars by tying some simple red & white baker's twine around each {addicted to twine!}.


Lastly, I digitally created a simple little tag to fit on top of the jar. I used double-sided tape to attach the tag, so it would be easy to remove for my neighbors.

**Click here to view the recipe for the peppermint bark I made last year for my neighbors. Another yummy & easy recipe!
**Just in case you're in need of a few last minute gifts, check out my GIFTING board on Pinterest. It's full of cute little gift ideas for neighbors, co-workers, friends, etc.
**Speaking of gifts, I'm finally ALL SET for this weekend. Can't wait for the fun that awaits us on Christmas morning!
**Wishing you and yours a BLESSED & JOYOUS Christmas. See you in 2012!

Thursday, December 22, 2011

{Holiday} Christmas Cards 2011


Simplicity has been a theme for me this past year, and one of my New Year's resolutions for 2011 was to do just that -- simplify life. I can't say that I've been 100% successful with that {*wink}, but I've definitely tried. Giving my goal one more plug for the year, I applied the simplicity theme to my Christmas cards. I love and appreciate all types of design, but I must say, there is something timeless and classic about a simple look, which I why I went that route this year.


I added very simple wrap labels to each envelope and then hand cut the ends to create a banner look.


Lastly, I added the same picture from the card onto the other side of the wrap label with our return address {teeny tiny but there}.


My mom also wanted a simple card with a picture of the grandbabies, and she choose a very appropriate bible verse to add to her card. "Glory to God in the highest, and on earth peace, good will toward men." Luke 2:14. This truly is the reason for the season, and something I am trying to focus on more this year in the midst of all the gift buying, wrapping, parties, etc, etc, etc.

**My Christmas card pic was taken by my favorite photographer, Karen Carpenter Photography.
**My sis nixed Christmas cards altogether this year. She's smart ;-}
**Dean and I are delivering our simple neighborhood gifts this afternoon -- details & recipe tomorrow!
**ENJOY the day!

Wednesday, December 21, 2011

{Gifts} Italian Themed


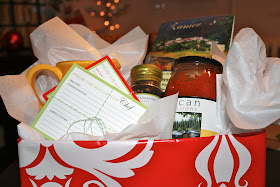
Last week my friend and co-teacher asked me to help him with a Christmas gift for his wife. He wanted me to put together a little basket with some goodies and all he told me was that his wife likes to cook and his budget was $25. Hmmmm....challenge.

My intent was to put together a really cute basket of cupcake/cookie baking supplies, but I shortly realized I would not be able to do it the way I wanted to with a $25 budget. On to Plan B -- enter in TJ Maxx and a soon to be Italian themed basket.


I snagged a bag of tri-colored pasta noodles, a fancy bottle of sauce, a nice peppercorn grinder and a cute little pitcher. It doesn't look like much, but let me tell you, $25 goes quickly.


Then I threw in two packs of recipe cards designed by Studio LIME Design. There was no money left for a basket, so I used an old shoebox -- wrapped it up with pretty paper, threw in some white tissue, arranged everything, and done -- mission accomplished.

If I had more money to spend, I would have thrown in a few other items. Maybe a nice spoon or ladle, a cookbook, a bottle of wine, and if I were my friend {and I suggested this to him}, I would go the extra mile and buy a giftcard to an Italian restaurant and throw it there with a note for a date night with his wife. He better do it! He lives in Collingswood and Il Fiore would be PERFECT!

Tuesday, December 20, 2011

{Invitations} Lego Themed Invites


Just imagine this invitation has a 5x7 perimeter around it ;-} I created it for my friend Karen of Karen Carpenter Photography. She is throwing her son a lego themed party, and knowing her, I'm sure it'll be amazing! Can't wait to see all her cute details!

**Thankful for each and every day I have on this earth, so please forgive me Lord for saying this, but I CANNOT WAIT until this work week is over! It can't come soon enough!

Thursday, December 15, 2011

{DIY} Holiday Card Display


The holiday cards have started flooding in in these last few weeks, and I'm loving every second of it. Seeing pictures of the families and/or the children always makes me smile, and I love to display them. This year I used an old shutter; I slid the cards into the different slots and angled them. I bought mini closepins to keep them secure in their spots and sat the shutter on top of my buffet. I'm running out of space quickly -- need another for all these cards asap!

**Wish I had a close-up shot of that shutter ;-}
**Hope you are enjoying the holiday season, which seems to be flying by.
**My Christmas cards are going in the mail this weekend and then I'll post a pic of them -- very simple.
**Please ignore my blog header -- busy busy week but I will be fixing it as soon as I can grab a free minute.
**Second grad class done on Friday -- Hallelujah! I NEED to be done, so I can focus on wrapping gifts and buying a few last minute Christmas presents!
**Enjoy the day!

Monday, December 12, 2011

{Home} Holiday House Tour 2011


We participated in the Holiday House Tour in our little New Jersey town on Friday night, and it was so much fun. We had approximately 125 people walk through our home, and everyone was such a pleasure to talk to. It was a great community building experience as well. After working a full day on Friday and running home to quickly finish up a few last minute things before the tour started, I was only left with a few minutes to snap pics {please excuse the poor lighting in some of them}.

Just to give you a little history -- our home is on old farmhouse that was built in the late 1800's. In the early 1990's a woman bought the home and poured her heart and soul into restoring it. She replaced the electric, took down plaster and added drywall, put in a new kitchen, added a small 1/2 bath on the first floor, added wide plank hardwood floors throughout the entire home, enclosed the once open staircase, and added custom built-ins and a brick fireplace in the dining room. She did a lovely job on all of the renovations and that is ultimately why my husband and I ended up buying the home in May 2009. We love the character and charm of an old home; however, we also love the modern conveniences that newer homes have to offer. This is a perfect marriage of the two -- an old home that has been updated without comprising it's historic charm.

Here is a walk-through -- WELCOME! As you will be able to see from the pictures, I love mixing the old with the new. First up is our family room, which faces the front of the home. It's a cozy room and we love hanging in there together as a family and playing with our son. Last year we added the built-in bench in the window alcove.
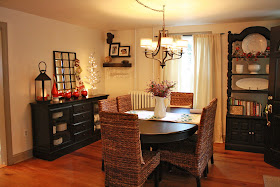

Next up is the dining room. This is the room you walk into when you come through the front door. This is also where we entertain when we host dinner parties and holiday celebrations.


Now you see the other side of the dining room. The previous owner added the large built in surrounding the fireplace. She used the original closet doors from the upstairs bedrooms to create the cabinets. The cabinets provide four nice sized storage compartments with shelving {not sure what I'd do without them!}.


Another angle -- just past the cubby unit and behind the built in is the enclosed staircase leading you up to the second floor.


The back of the home houses our little kitchen. We recently added a new tile floor, and made some changes when we first moved in in 2009 {added a white tile backsplash, added a glass panel to the top corner cabinet, and installed pendant lights above the kitchen island}. We are contemplating painting our island soon. I'm still thinking about it....hmmm....I love that look but....I'm a little nervous!


Most recently, we also added a small built-in desk/single bench seat {remember -- small spaces we are working with here ;-}.


This is a better shot of the built-in. I had a seamstress make me a fabric covered bench cushion, and I found a 12 x 18 black and white chevron pillow on Etsy -- perfectly sized for this small space. The pillow picks up on the chevron pattern I used on the kitchen rug I painted this summer. We also added two shelves with hidden brackets above the unit. I'm still not completely finished with this area, and will hopefully be adding a few more simple and subtle touches soon {pics when I'm finished}.


Another angle....


Attached to the kitchen is a small mud room that houses a small half bath {not pictured} and a built-in pantry we added after we moved in. Part of the pantry features open shelving {as seen above} and the other half has doors {behind the door}. Just beyond the mudroom is a tiny back porch that we enclosed with windows after moving in {it had been screened in}.


I snapped this picture while standing in the enclosed porch and looking into the mudroom. The big closet doors hide our stackable washer/dryer and a coat closet on the other side.


We added storage lockers to our back porch last year, and it was one of the best moves we've made. Each of us has a cubby, and we use them every day and all year long!


Let's head upstairs now -- this enclosed stairway definitely took a little getting used to when we first moved in.


One of my favorite things about our upstairs is the huge open landing area we have. It makes the second floor feel a little more roomy. In the open landing area, I added a bench with cubbies, a shelf, and a second Christmas tree. This tree used to sit in my mom's kitchen ;-}


The lone full bath is the first door you come to once you reach the top of the steps. We recently added a new tile floor and bought a new toilet {pictured below -- lol}. We love the clawfoot tub {but not so much taking a shower in it ;-}


I found the little black footstool under the window at Home Goods this summer and snagged it right away. It saves my back from breaking when I bathe my son every night in that tub!


The new toilet -- it sounds silly but even my husband loved this toilet when we saw it in Lowes! We love the square back and base.


This is our master bedroom.


Another angle...


My son's nursery....


This is the other side of the room. I've spend my fair share of time in that chair -- thank goodness it's super comfy ;-}


Changing table and dresser....


And last but not least is our back bedroom, which is a craft room/office. This will eventually become Dean's big boy bedroom in the future when our family grows. At that point, my craft room will move to our third floor attic, which we finished when we moved in -- one side is my closet and the other side will become the craft room.


My hubby's desk and home office area is across from my craft station.


The lighting isn't so hot but this gives you an idea as to what the outside looks like when the Christmas lights are turned on. Simple.


Lanterns adorn my front steps leading up to my door.
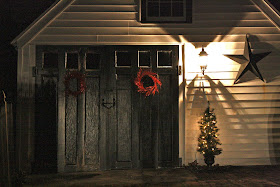

And lastly is my garage. We just had electric run out to the garage and added a lantern to give a little light to that area, which is very dark if unlit.

***The tour was on Friday night and on Saturday night, there was a private tour for the homeowners followed by a soup dinner at the Little Red School House. The homes were so nice to look through. The Bodo Otto House in Mickleton was MAGNIFICANT. I've wanted to see this home for YEARS. Dating back to the 1700's with ties to the Revolutionary War, this home featured seven fireplaces and so many unique, historic features -- there was a story to be told about each and every room. The owners might be putting it up for sale soon -- too bad it's WAY out of my price range at 600K+. Boooooohoooooo -- I WANT it!

Thursday, December 8, 2011

{Recipes} Turkey Noodle Soup


One of the best parts of hosting Thanksgiving is all the yummy leftovers you are able to enjoy in the days following the holiday. At our house, we make turkey sandwiches, soups, casseroles -- you name it. About a week ago, I used up the last of the leftovers and made a big pot of turkey noodle soup. We have all had colds & coughs in my house {thankfully on the mend at this point} and a mug of brothy soup and bread was just what the doctor ordered. Dean was a big fan too ;-}

Ingredients:
~ 1 cup {1/4-inch-thick} sliced carrot
~ 3/4 cup chopped onion
~ 4 garlic cloves, minced
~ 1 cup {1/4-inch-thick} sliced celery
~ 1/4 teaspoon salt
~ 1/4 teaspoon freshly ground black pepper
~ 6 cups fat-free, low-sodium chicken broth
~ 2 cups {3 ounces} uncooked egg noodles
~ 1 tablespoon low-sodium soy sauce
~ 1 bay leaf
~ 2 cups shredded turkey {about 8 ounces}
~ Coarsely ground black pepper **optional**

Directions:
1. Heat a large saucepan over medium-high heat. Coat pan with cooking spray. Add carrot, onion, and garlic; sauté 5 minutes or until onion is lightly browned.
2. Add celery, salt, and 1/4 teaspoon pepper -- sauté 3 minutes.
3. Add broth, egg noodles, soy sauce, and bay leaf. Bring to a boil. Reduce heat and simmer 5 minutes.
4. Add shredded turkey -- cook 3 minutes.
5. Discard bay leaf.
6. Sprinkle with coarsely ground black pepper, if desired.

**Recipe via Cooking Light.
**I made THIS the other night. So YUM! Not the healthiest dish but worth every calorie and easy to make. I paired with a green salad to balance out the calories ;-}
**So much to share with you and NO TIME to do it :-{ When will life ever slow down?!?!

Monday, December 5, 2011

{Photography} Experimenting...


...a little with lighting. Like most of you, I adore the Christmas season, and always admire the Christmas tree pictures I see on the web where there is that soft, pretty glow from the tree lights. My tree pics would always come out looking too bright, too dark, or giving the appearance that the lights were completely washed out. After experimenting unsuccessfully on my own a few times, I finally decided to try an online tutorial {click here to read the tips}. Magic! My tree pics look much better....not perfect....still a lot to learn, but a huge improvement from last year.


I even took one when it was light outside, and I was happy with the results. You can actually see the lights shining on the tree.


Dean and I have been reading the Nutcracker story before bed each night, and he loves it. His favorite part is when the nutcracker doll gets broken -- he says, "Ut oh!" about a hundred times ;-} While in Target last week, we happened to stumble upon a nutcracker ornament, and in the cart it went. He loves touching it ;-}


My Christmas mantle pic looks a lot better than my fall mantle pic. It definitely gives a better idea as to what the mantle looks like when the white twinkly lights are turned on.


On Saturday night, my little family went to the Pitman Grove light display. I tried my new lighting technique out while there, and I wasn't as crazy about the way the pics turned out. I think it may not have been dark enough because of all the light displays.

The Pitman Grove light display was a really fun little outting -- close by, no lines, about a 15 minute walk-thru, Santa & Mrs. Clause pics, and it's free {donations only}. Can't beat that!

Wednesday, November 30, 2011

{Random} Holiday House Tour


Good Morning! Our little, old home is going to be on the Holiday House Tour sponsored by The Little Red School House this year. If you are a local girl {or guy -- GARY ;-} and aren't busy next Friday night, then stop on by and visit us!

House tours are one of my favorite things to do during the holiday season. Not only do I love seeing different style homes and decor, but the holiday decorations are pretty to look at and put me in the Christmas spirit.

We are finishing up a few house projects that we had been putting off {pics soon}. The tour has actually been that kick in the rear that we needed to get stuff done around here!

Hope to see you there!

Holiday House Tour
East Greenwich, NJ
Friday, December 9, 2011
4-8pm
$10 per ticket
**Tickets sold at The Little Red School House, Haines Pork Shop & Affinity Furniture

Monday, November 28, 2011

{Entertaining} Thanksgiving


My family had a wonderful Thanksgiving from start to finish. Wall to wall sunshine and an unseasonably warm temperature started the day and family and delicious food and sweets ended the day. Perfect.

To say I flew by the seat of my pants this year with my tablescape would be an understatement. Thankfully, it all came together in the end, and I really like the combination of traditional and untraditional colors and details. I bought my dinner napkins first {Crate & Barrel} and built everything else around them. Maize, turquoise, green, eggplant, brown, orange, etc -- I had quite a palette to draw from.


I served ten guests total, so it was a manageable number. I set up a little card table in front of our fireplace and used burlap as a table cover to accommodate the overflow of guests.


I created individual dinner menus for each guest's place setting. I sized them to fit inside the center of the salad/dessert plate, which I sat on top of the napkin and dinner plate. Then I placed a few berries on top.


I also attached a round name tag with rafia to each guest's drinking glass. The table was already set when guests arrived, so everyone knew where to sit during dinner.

The green glasses are another Crate & Barrel purchase. I had seen them this summer, but decided to hold out for a little while. When I went back a few weeks ago -- GONE. Uggh. As a last ditch effort, I asked the saleswoman to check the back for me and she came out with ten of them. That was the last of them, and they were marked way down. Score.


The centerpiece was a hodgepodge of different items I pulled from here and there. Most of the items I already owned. I found the sparkly cream pumpkins and gourds for $.50 at Walmart. I snagged a few of those and scattered some acorns and pinecones around too.


The turkey was a PB splurge when my friend Alyssa and I took a decorating class there this fall. He's one of my favorite Turkey Day decorations.


We had some light munchies for everyone before dinner was served. Cheeses, crackers, some fruit, and wine.


I used my galvanized tiered tray, which is pretty big, so I filled in some of the open spaces with fresh parsley and artichokes.


The dessert table was pretty simple, and I added a pop of color with the pears. Anders Ruff's Thanksgiving tablescape was my inspiration {mentioned in my Thanksgiving inspiration post}.

My dad made an awesome homemade apple pie from scratch! He's my new pie maker for all future Turkey Days ;-}


I dipped my pears in caramel sauce {it went on a little thinner than I had hoped but oh well} and then sprinkled shimmery sanding sugar on them. So pretty!


I also made pumpkin pie mini's just for a change from a normal sized pie. They were simple -- I followed a normal pumpkin pie recipe for the filing. Then I lined a cupcake tray with pie crust {I used a glass to cut small circles and push in each cupcake mold}, filled with the filling and popped in the oven. Super simple.

I made a friend from work a ribbon bunting for her Thanksgiving dessert spread, and I really liked the way it turned out, so I made a mini one using the same colors {cream, brown and burnt orange} for one of the pumpkin pie tarts.

That's it!

**I can't believe it's already Monday again :-{
**Wishing you a quick and painless Monday ;-}