Saturday, July 31, 2010

{Details} The Cake!


My hubby picked up Dean's cake for tomorrow earlier this evening and it's currently chilling inside my refrigerator. I told Kara, the genius behind the cake, that I wanted something simple and complimentary to his invitation. I think she did a great job! She used a light blue icing with a swiss dot pattern and a chocolate pearl border. She also added the scalloped circle with the cross to the front of the cake just like I have on the invite. The inside of the cake is vanilla with fresh fruit filling. Hope it's yummy! And I decided to use the cake topper...tested it out and it looks really nice!

God Bless my Baby Boy tomorrow on his Dedication Day!

{Decorating} Guest Room Bedding


I'm working on my guest bedroom, which used to be our third floor attic. When we bought the house last spring, we had it dry-walled, taped, spackled, and Bo painted it. Then we added berber carpeting. Next, my father-in-law and Bo took one of the rooms and made a huge walk-in closet for me...nothing fancy, just a place for all of my clothes. There is another small room that I'm now finally converting into a guest room. My parents recently gave me my old bedroom furniture, which was also my mom's bedroom furniture when she was a little girl. I plan on painting it and using it for Dean's big boy bedroom in the future. For now, it'll go in the "guest room."

I found this pretty quilt for a steal at TJ Maxx! Love that store...hit or miss but it was definitely a hit last week when my mom and I were there...I had to restrain myself so my husband wouldn't kill me for spending too much money!

I will post pics of the finished space when it's done! Lots to do up there :-}

Friday, July 30, 2010

{Programs} Dedication


Dedication details...DONE! Just finished the programs this afternoon. They are cute and tiny and will be placed on every other seat where the service is being held. I rounded the edges of each and added the raised scalloped cross at the top.


TGIF!!! Relaxing at home with my hubby on this beautiful Friday night!

Thursday, July 29, 2010

{Details} Cake Topper


I made this little cake topper for Dean's cake on Sunday. I attached a skewer stick to the back with my hot-glue gun and then added some ribbon. I'm not sure if I'm going to use it...the cake is simple and I want to keep it like that. This might be too much. We'll see!

Printing the programs tonight, assembling them tomorrow, and then I'm done! Phew! I've got a ton of grad work to do for Monday....ugggghhhhh....last class....CAN'T WAIT to be done!

Wednesday, July 28, 2010

{Menus} Dedication


Here are the menus I made to sit on each table at The Rushes for Dean's dedication. They are 4x9 tented menus and say "Let's Celebrate!" at the top instead of "Menu."

This is a very special day...my husband and I are dedicating our son to the Lord and also dedicating and committing ourselves to raise our son in a Christian home. That's reason to celebrate in my opinion!

{Details} Dean's Dedication


I had a seamstress make me a Christmas tree skirt from my wedding aisle runner a few years ago and recently called upon her again to make my son's dedication outfit. I wanted the outfit made from my wedding gown, so she cut fabric from my train to make this. I also chose a pattern for his outfit from JoAnn's Fabric. I love the big pockets on each side and the little Peter Pan collar and tucks underneath. So sweet!


If you look closely at the collar, you can see that she also added a little button...it's the button from the back of my gown that was used for my bussle!

{Baby Announcements} Baby Girl CeCe


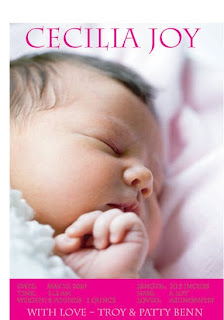
I just finished CeCe's birth announcements for her mom and my friend, Patty. If you remember, I posted the three options I gave Patty a few weeks ago. This is the one she choose. Love it!

Monday, July 26, 2010

{Invitations} Let Us Rehearse


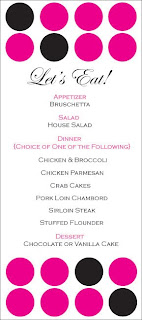
I posted my friend Lauren's rehearsal dinner|menu proofs a few weeks ago. We made a few small changes to each and now they are complete! They were both printed on a shimmery ivory cardstock, and I used dark pink and black accent colors because they are the colors being used for her August wedding!!!!

The invite is a postcard and Lauren will be writing the addresses on the reverse side {and saving a little $$$ on postage}. I like the simplicity of it, but also like how the fonts and colors add some interest and appeal to the eye.


I think this menu is so fun! I love how it says, "Let's Eat!" which is completely appropriate and even a little sassy for an informal rehearsal dinner :-} We also added descriptions under each entree for the guests. Can't wait to see these on the tables at the rehearsal dinner {I'll be there since I'm a reader in her wedding}!

Looking forward to the BIG DAY, my friend!

Thursday, July 22, 2010

{Inspiration} Amy Atlas :: Queen of Dessert Table Displays


Simply Stunning! LOVE the turquoise and pink color combo here....reminds me of Becky's Sprinkle! Wouldn't these be beautiful colors for a summer wedding? Ahhhh....

{Photo courtesy of Amy Atlas :: Link to her blog on my sidebar}

{Inspiration} ADORABLE Rice Krispy Treat Pops


Seriously? If these aren't adorable, I don't what is. I'm starting to gather some party ideas for Dean and I came across these. Definitely making them....so cute, right?! I will customize them to match my party color scheme since these are 4th of Julyish...

{Photo from Twig & Thistle :: You will find a link to their website on my sidebar!}

{Baking ~ Sorta} Ice Cream Pies!


I think I've established that 1.) I like to entertain AND 2.) In a not-spend-hours-prepping-in-the-kitchen kind of way. Right? So, here's another EASY dessert idea that I just whipped up for my dad's birthday dinner on Sunday. My dad is an ice cream fanatic. And if you know him, you know he's pretty much a bottom-less pit. A lean bottom-less pit. It's not fair. But he is a bit of an exercise fanatic, which probably explains the lean part.

You'll need:

~ 1 chocolate graham cracker pie crust {I made two of these}
~ 1 1/2 gallon of your favorite ice cream {I found Grasshopper Pie Limited Edition...Mmmm!}
~ Any toppings you might want to add {I like Hershey's syrup}


Just allow ice cream to soften up a bit so it's easy to spoon into the pie crust and smooth with a spoon. Then add your toppings. Put in freezer until ice cream hardens back up. Slice and serve. Done!

{Crafting} 5 Months?!?


Dean is 5 months old today! I am so blessed to have a happy, healthy baby boy that brings his mama {and dada} joy every day!

I went the ribbon route again to create his 5 month onesie....it's much quicker and easier than the fabric option. Since it's July, I used red and blue ribbon to create his 5 and navy star cardstock with a red ribbon to make his sign.


My big boy {who is suddenly grabbing everything & eating 3 meals a day on top of nursing!}


All-American baby :-}

Tuesday, July 20, 2010

{Drinks} My Mom's Iced Tea


I love iced tea and always have. And let me clarify....I love homemade iced....none of that in-a-can stuff for me. My mom's has always been my favorite. When I tell you it's the best iced tea I've ever tasted, I'm not kidding. It's THE BEST....no joke. She uses a secret ingredient. Are you curious?!? Okay, okay! Here's what you'll need:

~ a pitcher
~ 6 black currant tea bags {the secret ingredient!}
~ 1 cup sugar
~ fresh mint


Boil your water in a teapot on the stove. Put your 6 black currant tea bags in your pitcher. Pour boiling water over the teabags and let it steep for approximately 20 minutes. If you leave the teabags in for too long, your tea will taste bitter. Add 1 cup sugar while tea is still hot so it dissolves easily. I have a mint plant in my backyard, so I add a sprig of fresh mint to my iced tea.

ENJOY! You won't be disappointed!

{Inspiration} Cutest Little Ice Cream Cones


These are the sweetest little ice cream cones I've ever seen! I wish I had thought of this idea for my sister's sprinkle, because it would have played right in to the theme!

These are tiny tissue paper poms added on top of waffle cones and hung from a tree with pretty ribbon. CUTE CUTE CUTE!!!!

{Picture by Emily of Tiny Belles Boutique ~ it was a detail of her little girl's ice cream social birthday party}

Monday, July 19, 2010

{Details} Dean's Dedication Centerpieces

I put together the centerpieces for Dean's Dedication today, so I figured I'd give you a little peek at them!


I bought these white pots {found them at Walmart}, and I used my hot glue gun to add chocolate brown and white polka dot ribbon to them.


We are having a private Dedication at The Rushes at Town & Country Golf Links in Woodstown with a celebration brunch immediately following. The Rushes is a pretty casual restaurant, so I wanted something simple yet summery for the tables. I also wanted to add a little pop of color since Dean, myself, and my husband will all be in cream and chocolate brown tones that day. ****By the way, if you watched Regis & Kelly today, Kelly wore a very similar dress to the dress I will be wearing for the Dedication. The only difference is that hers was A LOT shorter than mine and she looked about a million times better in it than I do in mine ~ ha!****


I REALLY wanted to plant sunflowers in my pots BUT the sunflower plants I found were much too large. They would have toppled over, so....


....I went with these orangey impatients that will fit inside the pots much better. Flowers are pretty slim pickins' right now, but Platts had a fairly large selection of impatients, which are better for an inside venue anyway because they prefer shade.


Lastly, I made "centerpiece sticks" to stick in each pot. I used a photo corner rounder to round the edges of the paper and hot-glued a skewer to the back of each as the "stick". I also tied a little piece of brown ribbon around the stick.


ALSO WORKING ON & WILL BE POSTING SOON:
~ Dean's cake & cake topper
~ Brunch menus
~ Programs for his little service
~ His outfit {currently being made}
~ Pics from the day {which will be taken by my friend Lori of Lori Leigh Photography}

****I made a post on July 8th for a "Fruit Thing". I forgot to add AN EGG to the list of ingredients. I am soooooo sorry if anyone tried this and it didn't turn out. Glad you hadn't made yours yet, Jane!****

Friday, July 16, 2010

{Entertaining} Easy & Fun!


My FIL's birthday was yesterday and my husband literally decided this morning that he wanted to invite his family over tonight, yes tonight, for dinner, cake, and ice cream to celebrate. Well, as most of you moms know, life with a little baby doesn't exactly allow you tons of free time to cook fancy meals and entertain like Martha. So....we thought of something that would be quick and easy. My husband suggested hotdogs, sauerkraut, baked beans, chips, and a summer veggie like corn on the cob or asparagus. Perfect. Easy, inexpensive, minimal prep. Exactly what I wanted except it was kinda....well....blah. I needed to threw a little spin on it to jazz it up, so I decided to make a hotdog bar.


I love easy, quick entertaining and sticking to a budget ***BUT*** I'm ALL ABOUT presentation. That's where the hotdog bar came in. By the way, how cute are "bars" of any type?!?! Candy, cookies, ice cream, popcorn, hotdogs, tacos, and the list goes on and on.


That summer veggie I spoke of earlier? It turned into the spectacular little number above. {Bo made them...isn't he something?!}. These little TOMATO STACKS are super easy to make...all you do is:

~Slice Jersey tomatoes, mozzarella cheese, onion, and eggplant.
~ Drizzle the eggplant with a little EVOO and bake in oven for about a half hour {make sure they are soft when you take them out}
~Create your stacks by layering a slice of tomato with onion, then eggplant, then mozzarella, then another tomato slice. Top with a fresh basil leaf and drizzle with balsamic vinegarette.

These look so pretty on a serving platter and are a great summer side dish! Yummy too!


And that, my friends, is entertaining at it's easiest!

{Inspiration} Every Color of the Rainbow!


I am LOVING this rainbow cake {photo from How Does She ~ one of my favorite blogs}! This would be perfect for a rainbow themed birthday party, which I've seen some really cute inspiration photos for all over the blogosphere {not sure if that's really a word} lately!


This doesn't look too tough to make either. I didn't read her instructions, but it just looks like she used a thin cake pan for each colored cake layer and then separated each with a layer of icing....Mmmmmm!

TGIF!!!! HAVE A GREAT WEEKEND!

Wednesday, July 14, 2010

{Crafting} Binky Holders


My almost 5 month old son loves his binky. I have fallen in love with "binky holders" because they keep the bink attached to his body when it falls out of his mouth 100 times a day and keeps me from having to continually wash it after touching the ground. I've grown bored of the two I have from Target, so my cousin's wife, Kelly, gave me these little clips she found online. The pink one will be going to my sister if she has a little girl in September :-} Here's what I've got so far...


Using a needle and thread, I looped one end of the ribbon through the clip and stitched it closed. On the other end I attached a button {I might have to adjust this because it's probably not the safest option...I'm thinking major choking hazard} and made a little loop with the thread as a clasp. In the picture below, you can see how it holds the binky in place.


All you need are these little clips, some cute ribbon {I just used ribbon I had upstairs in my craft room}, a needle and thread, and buttons {I have a big jar from extras that come attached to new clothes}. I still have to finish this one....I'm going with a red, white and navy/patriotic look for summer.


This one was my favorite before Ginger worked her magic on it. It was chocolate brown ribbon with a white ticking stripe. This picture actually kind of makes me laugh now....not so much this afternoon when I found it in a million pieces on the family room floor - ha! There was also a yellow clip....she got that one too - ugh!


Dean's new bink holder in action! Do you see a little red in his hair and eyebrows or is it just me?!?


No reason for posting this picture other than my little guy looks adorable in it....I just LOVE him like crazy!


{Thanks for the clips, Kel!}

{Inspiration} Dollar Store Tiered Party Stands


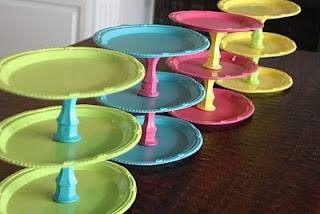
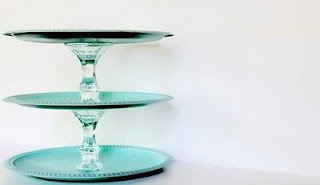
Aren't these FUN?!? They are made from spray painted plates and candlesticks from the dollar store {I did not make these, but I think I might try this!}. I love different kinds of serving trays, platters, stands, etc and have started to build a nice collection, but they can be pricey. Home Goods is usually where I find them at a reasonable price, but making your own from dollar store finds is even more economical!


This is cute for a more formal look.

{Photos courtesy of Joy's Hope ~ www.joyshope.com}

Sunday, July 11, 2010

{Invitations} Lauren's Rehearsal Invites & Menus


I am loving these fun and funky rehearsal dinner invites and menu for my friend Lauren's August wedding! The invite is simple and classic while the menu is a little funkier with the mod dots in dark pink and black {the colors of her wedding}. Also, since her wedding will be more formal, I tried to create a more fun vibe on the menu by using the heading, "Let's Eat!" instead of "Menu".

Thursday, July 8, 2010

{Baby Announcement} Little Miss CeCe


I am working on a birth announcement for my friend Patty's baby girl, Cecilia. I created three options for her to view. I can't decide which one I like best...


...but I'm leaning toward this one because I love the dark pink/light pink color combo. Although, I do like different aspects of each one.


Decisions, decisions. Which one do you like best?!?

{Recipes} Fruit Thing


The other day my sister-in-law and her mom stopped over for a visit. They brought me a ton of yummy peaches, which has inspired this post. I knew I could never eat them all before they rotted, so I decided to bake something with them! Originally this recipe was called "Apple Thing" and made with apples; however, I swapped out the apples for peaches and blueberries since it's the summer and these fruits are plentiful. I'm sure plenty of other fruits would work too.


Ingredients:

~ 6-8 apples {I used 6 peaches and 2 pints of blueberries}
~ sugar and cinnamon {for sprinkling}
~ 1 cup sugar
~ 1 cup flour
~ 1 egg
~ 3/4 cup melted butter
~ 1 tsp vanilla

Directions:

~ Cut fruit and sprinkle generously with cinnamon and sugar in one bowl
~ Mix the sugar, flour, butter, egg, and vanilla with beaters in another bowl


~ Dump the fruit in a greased pie pan
~ Next, scoop the mixture on top {it doesn't have to be spread evenly across the top}


~ Bake at 350 degrees for 45 minutes {or until top is golden brown}


***I serve mine with a scoop of vanilla ice cream. Such an easy and delicious summer dessert!***